I CAN’T GET THE MUSIC TO SOUND RIGHT IN THIS ROOM!
Ever said that?
In our Melbourne showroom having been around since 2007, we’ve heard our share of stories, frustrations and challenges from Audiophiles, in their attempts to achieve great sound in their chosen listening room and within their desired budget.
You Can Learn To Tune Your Own System – We’re here to help
Some of the questions asked are How can I get really good or big sound in my room? What will it take? What are the issues with this room? Why does the bass sound so bloated? Why does piano and some vocals seem so bright, as though the entire stage was right in my face? Is it my gear? Do I need to spend big bucks just to get this room and my music to sound really good? I know so little about acoustic treatment, what can I do?
Negative assumptions you perhaps have made about your room:
Maybe the room is just too small. Perhaps it has so many potentially acoustic reflective resonance issues that would need to be addressed, that the room may be hopeless. Maybe the walls are decked with cutaways and alcoves that are causing the base issues. Books, ceramic art, vaulted ceilings, ceramic tile or laminate floors and lots of windows or a big glass sliding door to deal with that are causing reflective resonance issues. Perhaps it is your home office and it’s the only room you have to work with for listening to music. It seems your investment in this room just isn’t going to pay off.
Could it simply be that your speakers and subs were not positioned in the exact place that they needed to be?
Perhaps this was done because your spouse didn’t want the speakers to stick out into the room. Maybe this distorted sounding room was not rectified simply because you did not have the knowledge, patience or know how, YET, to tune your speakers to the room.
Well, we pulled the trigger for you.
It is our hope that by the time you’ve read through the experience that we went through in this story, that you’ll gather some of the answers you need to get your sound improvement on the right path. Maybe solved. If not, stop in to the showroom and pick Ed Masterson’s brain, he always enjoys sharing ideas with fellow Audiophiles. Here’s a great video that explains what Ed Masterson and Audible Images is all about.
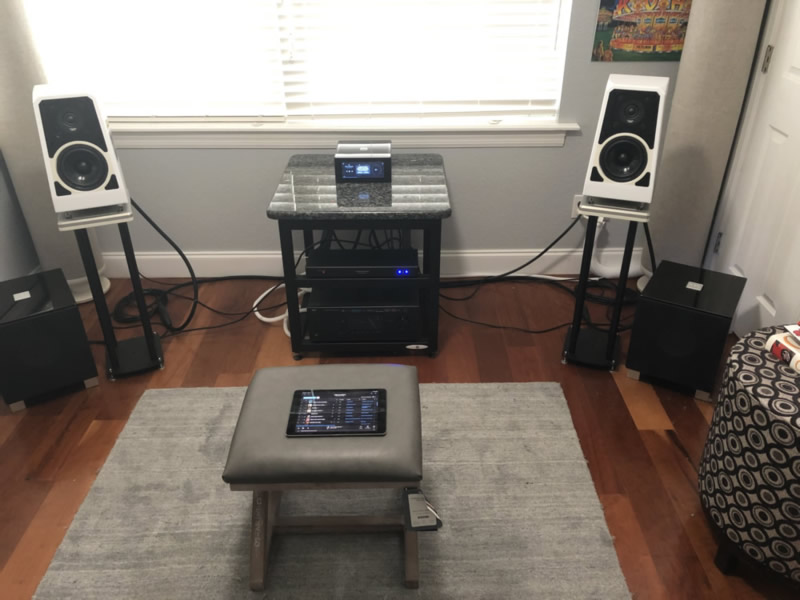
We took a room (which we now call “The Office”), that at first glance appeared to be an AV Audiophile Consultants nightmare in trying to get good sound out of such a space. Note: The blog post photo above is the initial room layout, the one that didn’t work out like we had hoped, but ended up sounding just okay.
- Ed Masterson, is as many of you know, a very passionate and knowledgeable Audiophile. So in his calculated yet shoot from the hip approach he just decided to take our former Office and convert it into a listening/demo room.
- I believe he did it for a couple reasons. One, it was time to do or add something new to our showroom, especially with an Event we had coming up. But two, I believe Ed wanted the challenge of taking a room that at first glance would seem to depict some major acoustic challenges and also seemed ridiculously too small for a listening room and yet would address the “Can I convert a small room in my home and end up with a Big Sound?” question.
- Our purpose here in this blog post: To share that a challenging room environment of a small office 10 feet by almost 11 feet could be made to sound excellent by proper placement of the speakers and with only modest acoustic treatment and zero use of EQ or room correction systems.
- Ed’s Passionate, Engineering and Audiophile approach to always find a way nailed it, big time. But not the first time around.
Basic Description & Initial purpose of room:
Our former showroom office is the room we used. Important note here is the fact that our entire showroom is a house, not a strip mall suite built for a retail type of store. So the point I am making is that our showroom quite easily replicates someone’s home. We are experiencing the same in home type of issues that you are addressing.
“The Office” (now our 4rth demo room) is a smaller rectangular space typical of a spare bedroom or small home office. It is approximately 11 x 10 feet with a vaulted ceiling that angles from just above the East windows at 9 feet approx, up to 11 feet at the peak of the apex. With two cutout vaults or alcoves. (One alcove is on the west wall , see photos, and the other is smaller and more angled and cut-out above the North wall) Both double windows comprise 94 inches wide by 52 inches tall of wall space, leaving only 3.5 feet of solid wall on the final Speaker wall, and just over 2 feet on the initial speaker test wall. Solid wood floors and artistic textured drywall throughout.
Below is a photo gallery to show you not only the Part 1 final setup, but more importantly, the room challenges, such as the walls, windows and vaulted type ceiling issues and alcoves. We’ll discuss the mild acoustic treatments later on in Part Two of this story. We want you to see the actual room acoustic challenges we were faced with in this 1st slideshow.
Photo Gallery of Architectural Acoustic Challenges and Finished Room Photos of - "The Office"


Acoustic Treatment:
We pre-treated the room if you will, by placing some photos (3 or 4) printed on canvas, no glass just a wood frame wrapped in canvas to absorb some sound reflections. Additionally, the room had 4 Tube Traps that we already had in prior locations within the showroom. Now with the casual treatments in place, we moved a “Silent Structure” rack (one of Audible Images own gear racks) with a polished and rounded marble top against the South wall and loaded it with some existing speakers and electronics gear.
Initial Sound Results:
We first tested the sound in the room with a McIntosh MA7900 Integrated Amplifier with Sonus Faber Guarneri speakers. Cranked it up, first test, FAIL, tonal balance was horrific , very poor sounding base. The base was bloated and had excessive muddiness. I would also add, very congested sounding, as the bass reflections bounced from the walls and mixed with the newest transient strike of the next note being played, before any proper base dynamic decay could take place. The mid range and highs couldn’t even be assessed yet. We couldn’t get it to sound right even though we did have a slight trace of a sound-stage. It was clear after re-positioning the speakers multiple times that we weren’t going to achieve a satisfying result, or eliminate the excessive bass resonance & muddiness issues. Just to feel like we were trying something other than moving speakers, we then connected the Rogue Audio Cronus Magnum II with the Guarneri’s to see what it would do with the base bloat. Yeah, let’s try a Tube Integrated Amplifier and see if that drops some of the bloat out. Nada, not much difference. So naturally at this point, we went to the bar across the street for some cocktails.
Just kidding.
Now Ed, already knew that this was simply a part of the discovery process of setting up and testing a new room. So it’s not like anyone was angry, or planning on punching the UPS guy coming in the door with a delivery. However, we knew we had to reduce some room reflections, since moving the speakers further out from the back wall to get our recommended distance (as shared by Audiophile experts) based on the size of the room was not helping. Nor did the adjustments of moving the Guarneri’s further in or out from the side walls help with the tuning process. But then we were saved. Our Sales rep from McIntosh and Sonus Faber showed up. Now he didn’t solve our problem, he just happened to bring a wonderful distraction from what we were perhaps to highly engrossed in, and quite frustrated with. Woody brought in the new Sonus Faber Minima Amator II’s and the Olympica Nova I’s for us to hear. This distraction brought us smiles, and this was a very good thing 🙂
Our base problem was in no way solved or necessarily reduced, but we were able to hear the beautiful transparency of the mids & highs of the Olympica Nova I’s. And the Minima’s were quite nice but the life-raft if you will of pleasure came mostly with the excellent mid-range and highs of the Olympica Nova I’s. This distraction was very helpful to me. (though technically the Guarneri’s should blow away the Olympica’s for the simple fact that they are more than twice the price, but for whatever reason, no go, the Guarneri’s are great speakers, they just didn’t like being in this room on the South end).
Ordered New Gear:
Being in no rush, we put the room on hold until some new floor products arrived. We had ordered the Wilson Audio Tune Tots and the NAD M10 Integrated Streaming Amplifier .
We were pretty excited to hear the Wilson Audio Tune Tots. Our showroom was already modestly stocked with Wilson Audio speakers which include the Wilson Sabrina’s, Yvettes and the Alexx’s which are in our main listening room “The Transporter”. But now we would have the opportunity to hear the Tots with their new custom Isolation Base. And we had already read a nice review on the NAD M10 Streaming Amplifier which is part of the NAD Master Series. We have the NAD M17 Preamp/Processor along with the M27 7 channel Amplifier in our modest high end theater demo room called “The Escape Pod”. And now the opportunity to hear the tiny M10 Streaming Amplifier that is spoken of as having a big sound in a small package was kind of exciting.
We got the Tune Tots placed with their Isolation Bases and on stands. The M10 was setup on our 2 tier rack, connected, and we then let the testing begin.
What followed? We had a major Audiophile paradoxical laugh! Now we weren’t getting hardly any base with the new Tune Tot bookshelf monitors on stands. We went from a massive buffet of base , to starvation from base. Pretty funny actually. We decided the Tune Tots could not be to blame. Partially they could and this was simply because the Wilson upfront frequency specs on them were 65 hz to 23 khz. Something was causing extreme + or – base issues and for now we could not address it with speaker positioning, mild acoustic treatment or even with a change of three different amplifiers.
Now the pressure was really on. We had our annual “Music Appreciation Event” coming up in like 10 days and we had a new room that at this point needed to have the door closed and padlocked during the Event.
Some Success:
So, when you have an excellent set of speakers, and an excellent amplifier but minimal base, what do you do next? You add stereo subwoofers from REL Acoustics.
We pulled in the REL T7i’s as a pair from “The Escape Pod” room, because now with the Tune Tots we no longer had a bloated base issue, but rather a non existing base issue 🙂 So we tuned the subs in the best we could that day. The T7i’s could provide down to 30 hz, and the Tune Tots already had that magical Wilson Audio Time Alignment and Tonal balance magic with their mids and highs as depicted in all of their speakers. So after getting the High level volume set with the REL’s, the REL Crossover’s set, we had the room sounding pretty good.
Ed continued to tweak the room via minor speaker adjustments, toe-in, etc, adjusting the modest acoustic treatments, placing sound absorbing objects in the two alcoves above the two walls.
And whallah. The system was tuned. The room was tuned. It sounded pretty good.
A couple of days later, Ed called our manufacturer Reps from Wilson Audio, NAD, Sonus Faber/McIntosh and REL Acoustics and he cancelled our November 2019 Event, and rescheduled for late December.
The room just wasn’t good enough for Ed. He knew that it was time to completely change the layout of the room. Good was just not good enough. Not for the Passionate/Audiophile/Engineer/Customer Service mind of Ed Masterson who believes a customer’s high end sound system should be treated like a Doctor monitoring a Heart Patient’s Pacemaker, with a great deal of finesse and care. And thus the same treatment and setup for a room in our Audible Images showroom.
Summary of How To Get Started in System Tuning including the room we did.
- Just get started on your room. Follow the rules if you will that say to place your speakers about 1/5 distance of the room from the back wall. Even up to 1/3 in some cases. We did about 1/5. Arrange your speakers and your center listening chair in about an equilateral triangle position. The chair can be closer to the speakers, than the distance between the 2 speakers. Experiment a little, because different speakers have different position requirements
- If you have a lot of window area like we did, close the blinds or shades about 2/3 to reduce reflection. If you have a bare floor, get a nice simple throw rug with a simple carpet padding underneath it to absorb reflections also. Remove glass frame pictures on the walls and just use canvas wrap pictures if possible.
- Add 2 bass traps and 4 if possible, ASC are the ones we used. Pricey, but well worth it.
- Use a table or equipment stand that has very low to almost no vibration issues. We fill our racks with sand and seal the ends with a silicon glue to absorb and dampen vibration issues.
- If you really want to learn how to get your room sounding awesome, you need to learn the language of good sound. Why? So that you can describe to Ed or others what you’re hearing or not hearing so that others can help you with your room tuning. First read the ever critical article at Crutchfield: Learn the language of good sound
- The article in the line above provides an excerpt from the Introductory Guide to High-Performance Audio Systems by Robert Harley , Editor-in-Chief of The Absolute Sound magazine. This stuff is not that complicated per-say from a reading perspective, but it does take time & patience to learn it. So read the above article and start to learn the terms I list here in next bullet below
- Sonic Descriptions and their Meanings, Frequency Ranges, Tonal Balance, Overall Perspective, The Treble, The Midrange, The Bass, Soundstaging, Dynamics, Detail, Musicality
- For terms that drill down in explaining details within the terms just mentioned above, use Stereophile.com magazines Online Glossary called: Sounds Like? An Audio Glossary Glossary
- And to really take your knowledge to the next level in systems get the hardcover book or the Kindle/eTextbook (like I have) for: The Complete Guide to High-End Audio Fifth Edition by Robert Harley – $14.99 eTextbook/Kindle or Paperback $24.95. AWESOME BOOK!!! You can take notes right on your iPhone or Android and it remembers where you left off in the book.
- We’ll get into other details in Part Two of this story/article. Ed Masterson has had over 25 years experience building and tuning systems and it is his passion. Come in, ask Ed questions, and have fun taking your system to the next level! Miguel and Myself also love this stuff and want to help.
THE MIRACULOUS ROOM AND SYSTEM SOUND CHANGE WILL BE COVERED IN PART TWO of :
How Can You Get Big Sound in a Small Space? – Part Two
We enjoy being your go to source for all Your High Performance to Ultra High End Home Stereo two Channel systems, Modest to Ultra High End Home Theater home entertainment systems. We also enjoy Audiophiles just dropping in to talk the hobby, ask questions and even pick Ed Masterson’s brain on questions about your system and also about used and pre-owned gear sales, including in which we are also an authorized Audiogon Dealer, to help move your former gear as you pursue upgrading thoughts that you may have now or on down the road.
Audible Images AV is pleased to be serving: Melbourne, Florida, Rockledge, Merritt Island, Cocoa Beach, Cape Canaveral, Port St. John, Satellite Beach, Space Coast, Vero Beach, Orlando, The Butler Chain of lakes including Lake Butler, Lake Tibet, Lake Down, Lake Sheen, Lake Louise, Lake Chase, Pocket Lake, Lake Blanche, Wauseon Bay, Lake Isleworth, and Little Fish Lake, along with Bay Hill, The Villages, Lady Lake, Daytona, Kissimmee, Central Florida, the entire state of Florida…and even the greater USA, for all their Stereo two channel and Home Theater systems.


